Thursday, December 16, 2010

Best Christmas Present Ever

It's true. It came early.

I was on the phone this evening with my mother (and feeling impatient during the call because she likes to call right when I ought to be cooking dinner, and talks about nothing important at all) when I got the dreaded call waiting beeps. Usually I ignore them since I am terrible at interrupting people.

This time I took the call. I had to when I saw that it was a business where my husband had been for a job interview just yesterday.

He got the job. His first day is January 3rd. Yes, this is the best news, and present, we could have asked for.


Here is to more happy days ahead.

Pelee Island, August 2010

Productive, Unproductive Day

I am working on my last term paper. It is getting ugly now - my ultimate plan is to stay up tonight until this puppy is done.

Remember my mantra - FINISHED IS BETTER THAN PERFECT. Finished is productive. Finished is useful. Finished is freedom. I am desperate to remember it myself. It is the only thing that can save me.

A mediocre finished paper is still much better than an unfinished, late, weight-on-my-shoulders term paper.

I stayed up until 4am last night. Today, I needed a slight break so I decided the best thing ever would be to sew FIVE PAIRS OF PYJAMAS! It had to be done, really. If there is one thing my kids need it is PJ's. The best thing about these is they were made entirely out of my fabric stash. I was just fortunate that I was able to match enough fabrics to coordinate tops and bottoms.

Most of my homemade Christmas gifts are sitting unfinished (is there a theme here??!!). Some are really close to being finished, but not quite. Thankfully, teacher gifts are done and given. Phew.

Not having much to wrap is a sad state to be in.

Those who know us, know that my husband has been out of work for five months. My own income is pretty shabby since I finished my contract job last summer and I don't have much time with my full-time classes. So, I have to make a WHOLE lot of gifts this year (every year actually, it never really is that different).

I know a lot of you out there are in the same boat. Maybe some choose to make things because they believe in it - it is from the heart truly then isn't it? Perhaps others would like to be able to buy a few things, but it just isn't happening this year.

Here is my Christmas UFO and TO DO list:
  1. Vanity and Chair (it already exists since it was purchased from Kijiji, but needs paint, some repair and to recover the cushion)
  2. PJ's pants for one older child 
  3. Camisole and panties - Jalie 2568
  4. Girls Nightgowns  (from peasant style dress instructions)
  5. Mock Crochet market bag
  6. Zombie Knit Hat (making this up)
  7. More Bath Bombs (finished one batch - turned out awesome!)
Stuff that was planned but will not get done:
  1. Knifty Knitter Socks
  2. Knifty Knitter Mitts (2 pair)
  3. Knifty Knitter Poncho
  4. Monster Pillow Copy
  5. Dress up clothes
  6. Jalie 2919 - Cardigan
  7. Knifty Knitter Sweater

Since I have much to do. I will get to it.

Quit stalling.

Monday, December 13, 2010

First Snow Day


Today was the first REAL snow day this year. And there was no mistaking it either. Everything in town screeched to a stop. The municipal office closed. Some roads were closed. The mail was not delivered. The snowplows were pulled off the road.

My chickens were snug in their hen house. They refused to come out into their covered run today (let alone the uncovered run!). There are wind gusts up to 50km per hour.

This is a great day for hot chocolate, baked beans (in the oven baking as I write this) and a good book, Christmas movie or anything else comforting to do. It isn't a day for building snow forts or skiing.

Monday, December 6, 2010

Looks are Deceiving

Okay, as a follow-up to last week's post I am writing a review for the cinnamon bun recipe I mentioned Clone of a Cinnabon.

As you may remember from the last post Lazy Day, Sunday I wrote that I tried out a scratch recipe for cinnamon buns (among other things) and that while it took a really long time to rise, they came out fabulous. Tender, sweet, fluffy, flaky - although they were somewhat small and hadn't risen that high.  They didn't LOOK like the most wonderful cinnamon bun, but they tasted great.

This week I decided to break down (it is the holidays after all and I want the perfect cinnamon bun for breakfast Christmas morning - a tradition in our house) and try another recipe. I was hoping to find one that worked in the bread maker, assuming that it would be faster, easier and perhaps better.  You are right to point out that no one NEEDS cinnamon buns two weeks in a row.  They aren't healthy and most of their ingredients are not local either. :( However, we can't be perfect every week can we?  I feel good in not buying Pillsbury dough or supermarket premades (I am pretty sure that should be a word).

These buns look absolutely picture perfect. They are huge - you get 12 rolls in the batch (compared to 16 in the last recipe). But that is more of a method, not the recipe itself - which is actually a 4 1/2 cup of flour recipe,  versus the 3 1/2 of the other recipe - since it instructs you to cut them into 12 rather than 16 for the previous ones. You could cut them into 8, 13, 27 or whatever and have larger or smaller buns. 

In the moment of  truth - they aren't as tasty. They are fluffy and flaky, but they seem a bit bland and they are a little drier. In fact, I found that they didn't have enough icing  and they were really just TOO BIG. I wasn't enjoying the last few bites. And, that is a bad thing. 

Consider them side by side:

                 1st try                                                                                2nd try

So, next time I will compromise.  The first scratch recipe could easily be made into 12 larger rolls - then they would be higher and perhaps more visually appealing, yet with the smaller batch of that recipe, they would not be as large overall as the Clone of a Cinnabon recipe. Sort of in-between. I would still get the flavour and moistness of my preferred rolls but just a little bigger.  

Can't wait to try it - when I can convince myself that we need to try another batch. Right now we still have to eat another 10 HUGE rolls.  So off I go...

Sunday, November 28, 2010

Lazy Day, Sunday

Today is a really lazy day. I am still in my PJ's. There is talk of us watching the Grey Cup and eating Chicken Quesadillas tonight.

 However, we are also running a stomach flu through our household - today it is my youngest daughter Allison who is sick. So, we also have plenty of laundry.

To be clear, when I stated we were lazy (which I thoroughly meant) my husband and I have been baking most of the day. AND, the best part is that our hand mixer broke (I haven't been blessed with a stand mixer yet) and we mixed everything by hand. Elbow grease is a good thing.

~ If you are on a DIET in any way - STOP reading now. Seriously. ~

It started with the cinnamon buns recipe discussed on Foodess.com. However, there is very serious error in the recipe (see note later in post) which has caused a delay in our consuming these.  Then came a couple loaves of 5-minute Artisan Bread started yesterday (yummy).  After allowing those to cool we turned to Chocolate Mint Cookies also from Foodess.
These cookies are totally addictive. I thought with the ridiculous amount of cocoa and semi-sweet chocolate that they would be decadent enough to prevent over eating. Wrong. 

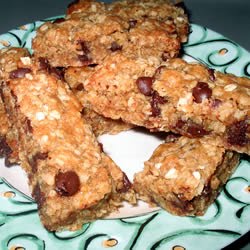
As it turned out, I was running out of chocolate chips. So instead I used 1 cup chopped semi-sweat chocolate squares. The recipe instructs you to make 1" balls of cookie dough, slightly flattened. I found this to be best, especially if you wish to take these to a Christmas party or give away as they make lots (we got about 112 small cookies).  Alternatively, I think these would work well if you wished to extrude in a cookie press and add a chunk of chocolate (or other garnish) to the centre before baking. In any case, if you like chocolate and mint - these are worth a try. A very easy cookie with enough decadence to impress guests, a hostess or a teacher for a lovely, edible holiday gift.

Okay, now to the cinnamon buns. Note these are risen yeast rolls, not the biscuit type cinnamon buns (which, by the way I hate, and yes, you can read this as full hate - if you really love cinnamon buns, biscuit-style, rip-off cinnamon buns are NOT going to cut it, no matter how desperate or how bad your baking skills are. At this point you are likely to go Pillsbury on me since I have digressed - my bad).

This recipe is also featured on Epicurious.com with many raving reviews. This is where I found out I wasn`t in fact crazy - at least not this time.

When I started making the recipe, I realised right away there was a serious problem. It calls for 2 1/4 tsp of  rapid rise yeast with "2 envelopes" in brackets. Any baker will tell you that 1 packet is 2 1/4 tsps, not 2 packets/envelopes and packets of yeast are pretty standard. My question was - which one is it? Some people will likely measure without worrying about packets, some will just use 2 packets and others will question this whole thing  (and probably over complicate things for several hours - I am the latter).  I realised after making the dough that because of the rave reviews, most people probably used the 2 packets without question (or measuring). As it turns out, reading the reviews more closely, this is likely what has happened. Those who were more exact, realised their mistake and that the dough does not rise on 2 1/4 tsp yeast in 2 hours. Because I am exact myself, I needed to wait a full 4 hours for this dough to rise to double. And, for the second rise, I also had to double the time. This means that all told, it needed to rise for 5 1/2 hours! WOW. 

After contemplating for hours and looking at another bread recipe on Robin Hood I finally thought of a possible answer for the mix up.  The Robin Hood recipes have the packets listed first and then the size in brackets, like this: 2 envelopes (2 1/4 tsp/11 ml) whether it is one or two envelopes it has the same "size of the packet" clarification listed - what would happen if you mixed up the order of the words? It would look like you meant the packet size for the quantity or: 2 1/4 tsp (2 envelopes).  If I am right, it means this recipe is being passed around without correction and many are suffering as they either a) give up in the middle with a hard dough, b) pay no attention to if it has doubled and bake hard dough balls, or c) wait 5,000 hours and at least come up with something edible. Serious bakers might tell you it has more to do with instinct, experience and common sense than exact times and measurements - so the extra waiting is likely worth it if you need to wait longer for your dough to rise.


Lovely cinnamon buns - much yummier than a phone pic can show

Thankfully, the extra rising time did the trick. These did work. So by 3 in the afternoon, we were eating luscious cinnamon rolls (I started at 8am).  Actually, they were quite easy - the worst part was them not rising despite my putting them in a nice warm oven with the oven light on and my whittling away the hours attempting to figure out who and what went wrong with the recipe.  Too bad some of my crew can't eat them right now (heh, more for the rest of us).

The best part was that this is my first attempt at a yeast dough that actually worked. I haven't tried bread making from scratch for about twenty years. Back then, when I was a mere babe (ha) I was not successful at making from scratch bread. My results were very discouraging and I hadn't tried again since.

At this point, I must also be frank in that I have many times made the cinnamon bun recipe that came with my breadmaker. In fact, it is a family tradition in our house to have this for Christmas morning, and I love to start them the night before and pop them in the oven in the morning for a no-mess easy breakfast treat. However, that recipe has really let me down for flavour and texture. It just wasn't as good as a great bakery cinnamon bun (or Pillsbury) and I never knew what to do - it was dry too. For several years I had this Clone of a Cinnabon recipe from Allrecipes.com saved  to my recipes. What I loved about it was that it was a breadmaker recipe that I knew I could handle.  It has even more than rave reviews and I still plan to try it out soon for which I promise to post an update for those of you who aren't ready to try rolls without a breadmaker. For now, I am happy at what I accomplished for our lazy Sunday at home in our PJ's.

~Ciao

PS: The purse organizer I made for my aunt was verified as "perfect" so, despite my misgivings, I actually did measure correctly. She just has the mother of all purses. :)

Monday, November 15, 2010

Measure Twice, Cut Once...

I worked on a number of sewing projects in the last few weeks, which meant that our dining room was a disaster (as well as the rest of the house since threads seemed to be tracked everywhere!). It was fun getting back into the groove again however, since it had been awhile since I had been sewing.

Because I don't have a sewing room and I must mess up the dining room (which is where our family eats every meal because we don't have an eat in kitchen) I usually make it count by doing a marathon event of sewing, not just a small project. It wasn't quite a marathon this time however, but more than one project was pretty time consuming.


Brazilian Hipsters - 5 min sewing project!
This time around:

  1. Regency Period Hallowe'en Costumes - including short stay from Sense and Sensibility Patterns
  2. Two pleated cardigans  Jalie 2919 - one from fabric in my stash! Yay!
  3. Three pair of  Jalie 2568 - Brazilian hipsters
  4. One pair of Jalie 2568 - low rise hipster - out of scraps from one of the cardigans
  5. One purse organizer - no pattern, just a draft of my own.
There is the problem. Last year I made one of these purse organizers for my mom for Christmas. These are something you would stick inside your purse and you could remove it and put it in a different purse and still have everything. My mom asked for one of these, but sent me a link to one you would purchase online already made. It was about $60 plus shipping and it was from the US, so I may have paid duty, brokerage fees etc.. 

I wouldn't do it. It looked easy enough and there were patterns out there such as this one for a PortaPocket. This pattern looks quite nice, but I wasn't into buying it. First, I like to wing it, second, it would add significantly to the cost of the gift (unless I made millions more!). 

It went over well (I forgot to take a picture which is sad because the ladies at the fabric store who helped me on Dec 23rd to figure out how I might put it together without a pattern may have appreciated seeing how it turned out!) and at Thanksgiving this year I was asked by my aunt to make her one too.

Wait, that isn't the problem yet. Sure, I would like to devote time to my own projects rather than taking on new. And, I don't remember any offer to pay for fabric or anything else, but that is nothing really, compared to the real problem.

I measured my aunt's purse hurriedly on the way out at the end of a long Thanksgiving Day. We had a two hour drive ahead of us. You might be able to imagine the rest. The point is that it must fit into her purse and her purse must be able to close. I am not confident that this will be possible because once made up (and I actually made it quite a bit smaller than I measured for) THIS THING IS FRIGGIN' HUGE! It is about 12 x8x4"

Purse Organizer 

Other Side - pen holder, cheque book or other flat object holder

 Side view - small pocket

Inside view, roomy pockets

Close up of zippered pocket

Close up of credit card holder

Close up of tissue holder with strap

Another view - side has clip for keys or other item

Reversible - this is it flipped inside out. Your choice.

Close up of elastic detail. I dyed this fold-over elastic years ago and it matched. Nice.
Now, it came out pretty nice I must say -  but it is SO large. I am concerned it won't fit her purse. Won't that be a disaster? Well, maybe it will work out - I mean, in my memory her purse was huge. I think. If not, it would probably work great for inside a tote bag.

In the bright side. I used up some scrap fabric, and found notions to recycle for this. I did buy a yard of fabric though.

The saddest thing is that we had company on the weekend (wait that was the good part) and we cleaned up the dining room and put my sewing stuff away, so while I still  have a sewing bug, I can't sew right now :( . I guess I should finish up some Knifty Knitter projects instead.


Tuesday, November 9, 2010

Enviro-Couture

One of the sewing ideas I have in the past involves taking perfectly good, underused, dated or even damaged clothing and turning it into a newly loved item.

Examples:
Adult or child's large sweatshirt into infant romper/sleeper - haven't found an online tutorial for this. I am sure there is one somewhere. I got the idea from this book:
 This is a great book for people who are just learning to sew or just want some simple projects for fun gifts. Sadly, I am pretty sure it is long out of print. 


Sorry for the blurry picture - but this is an example of what I mean by re-purposing a shirt into a romper. I used a shirt no one was wearing because it had a rather "loud" graphic on it of a wolf. Of course, this was years and years ago and I don't have the romper now.


Cloth diapers from t-shirts / sweatshirts - see: http://fernandfaerie.com/sewing_fitteds.html
This tutorial wasn't around when I was cloth diapering, but it looks like a great, informative site that those thinking of cloth diapering should check out. T-shirt diapers are wonderfully absorbent and stay so soft after lots of washings.


Men's shirt into woman's blouse - I haven't done this yet, but I seriously plan to. There is no shortage of men's shirts around.  See: Stripes in (re)fashion – Learning Sewing | BurdaStyle.com and Peasant Top from a Man's Shirt at Cut out and Keep.

Of course this is only a tiny sample. Others could be cloth menstrual pads, dinner napkins, lots of kids clothing, rag-rugs etc.

Hoards of clothing get dumped at thrift shops, which on one hand is great for providing affordable clothing to those of us who wish to purchase it, however it also is indicative of the throw away society we have.  Check out the horrific economic and cultural impact second hand clothing has on the developing world in this paper at Oxfam and this good but old article in the Washington Post.  As important as reusing is, if it is at the expense of certain economies over others, it is worth it or fair? Better for us to take care of our own clothing, think before we buy (do I need this?) and look for innovative ways to re-purpose some clothing rather than discard each season.

Happy re-purposing!

Friday, November 5, 2010

Economic Development, Big City Style?

Not sure what to think. My first instinct was it was catchy, but didn't really make me feel like it captured the essence of Meaford.

What do you think? Would you want to live here?


I can see this is promoting Meaford more to the leisure class. Which is interesting as that is the demographic we are already attracting.

I believe this video was recently concocted by our "big city" CAO which is lately pulling out all the stops to attract business investment in my little Meaford.

The only other thing I can state now is: whatever.

Monday, November 1, 2010

How to Make Your OWN Knitting Board

The following tutorial was created by someone named Dick Robinson.  I have never spoken to Mr. Robinson, however there are many references on the web to this tutorial which is now only accessible on the WAYBACK MACHINE on the web.  The original tutorial was taken down some time ago. You may access this tutorial from this link:

However, I personally found it took a very long time to load and sometimes the pictures wouldn't load at all. So I have saved all of the 13+ pages into this one PDF document for you and I to use. I haven’t made this board yet, but it is on my Christmas list I gave to my husband. I will keep you posted if I indeed get it and will post how well I like it with pictures of the board and any projects.


Download the PDF HERE
You shouldn't need to log in to access the document. However if it doesn't work feel free to contact me at denise. whaley @ hotmail. com (no spaces). Let me know if you make this board using the instructions - ENJOY!

Sunday, October 31, 2010

Too Late for Hints

Too late for hints because I didn't get around to posting about my secret sewing projects. So much went on this week, papers, a conference, municipal election....

Here is what I was working on:
Miss Elizabeth Bennet and Mr. Darcy - or an approximate


They aren't perfectly period I admit, however I am wearing a period stay under my dress and chemise. We had a hard time getting a pattern in time for Mr. Darcy's frock coat, so we had to make due with a later style coat, but I think we pulled it off reasonably well.  I managed to get some drapey 70% wool at Len's Mill in Guelph in a midnight blue. We were going to heighten Mr. Darcy's hat as well, to be more "Regency" but we ran out of time.

We attended a Halloween dance, and I will tell you my dress hem was quite stained with beer and dirt from the floor by the end of the night. We had fun though - a great night.

Here you can better see the lovely embroidered fabric. I was given this fabric a few years ago (left over from someones bridal gown I think - came from a bridal-wear seamstress) and the moment I saw it I thought of this gown. For the lining I used an inexpensive cotton muslin. It has good body and you just can't beat $4 metre.

Monday, October 25, 2010

Winterizing the Chicken Coop

We are almost finished getting our coop ready for winter.  We now have about an R-11. Not perfect, but better than the R-1.75 our plywood was previously! We added blue panel insulation and another inner wall-board.  I still need to paint - but it may have to wait until after the winter if the weather doesn't hold out. Soon it will likely be too cold to paint. Plus I want it to be dry so it will be good for our ladies to sleep in that night. 


Here is the inside - we now have two roosts.
 One at 18' and one at 28". 

The thermometer is obviously so we can keep an eye on the inside temperature.
  Here is a view from the opposite side - facing south.
 Looks like someone is in need of privacy! Soon after she laid a lovely perfect egg.


Yay! The "finished product" as it now stands. We realised their run was far too small and they needed more room. We have had to contain them in their coop and run more often for their own safety as our little yard fence in some spots is only 3'  and one day another dog got in our yard! Thankfully, our dog came charging out (likely to play) and scared the other dog away. Phew!  So, we added a dog run to the side which is 6' high and 7x13' which gives them a total of 129 sq ft in their run to play and scratch.  We will add some aviary netting on top of the run to help keep predators out.  We try to be diligent about putting the ladies away promptly at night as their new run extension is NOT predator proof.

Friday, October 15, 2010

Secret Projects

It turns out I am about to have one of my wishes. I am working on a very special project for Hallowe'en that I have always wanted to do but never got around to it. Period Costumes.

I won't say what period now, but as time rolls by I will post some hints and pictures. My husband and I are going as a pair if that is any hint.

Wish me luck as I haven't had my sewing machines out for awhile.

Yes, I should be working on term papers and such. But sewing is much more fun. With some luck (and planning) I will get to the papers in due time. :)

Wednesday, October 13, 2010

Little Baby Gifts

I am not much of a knitter. I only remember finishing one needle knit project in my life which was a scarf from a kit my son got for Christmas. He got bored knitting after a few rows, so I finished it for him.

All that stated - I love knitting on the knifty knitter. I would say that perhaps I am addicted to loom knitting and I would love to start knitting socks.
I made this little hat for my new niece Evangeline. She is nearly one month and to be honest, this hat JUST fits. She will likely wear it a month and that's it.  So, truly it is a newborn hat.  I used the Knifty Knitter red loom, two strands of worsted weight 100% wool.  I based it on combining a pattern for a gorgeous needle knit berry hat and an apple hat pattern with a standard Knifty Knitter hat.  I used a 1 over 2 stitch in an e-wrap. The sizing it important because I have read the smallest loom is for newborn hats, but I can attest this will not work as this is what I use for mittens. Also, the red loom is written to be for children 2-5. Wrong again. Firstly children 1 and up have big heads - babies' heads double in size the first year.  I have used the green loom for children 2 and up quite easily. 

I apologise for the strange background for the hat. I snapped this before popping it into the bag and arriving at our Thanksgiving destination.

Eggs, Eggs, and more Eggs...

My girls have been busy.

Some people who have no knowledge of backyard chickens, or chickens in general, might be wondering how many eggs these ladies will lay. I was one of those people only a few months ago and I am still learning every day.

Well, it seems Barred Rocks lay plenty. My girls have now produced 12 dozen eggs as of  this Sunday. That is 11 dozen eggs in only 5 weeks from only 4 hens.  At full production we are now getting a dozen about every three days.

Now, I realise that their laying will reduce in the winter, but for now we are enjoying the delicious eggs we are getting every day which is a bonus most pets don't provide. That is right, I wrote pets because, after all, that is what they are.
Allison with Dot.

We enjoyed Canadian Thanksgiving this past weekend. Family, food and fellowship. Now that sounds Christian! Some of my family members asked the same questions everyone asks of us when they find out we have chickens in the back yard.

For your amusement, here is a list of FAQ's I created from our conversations this weekend.

On keeping chickens in the backyard:
------------------------------------------------

Q1: Don't they smell?
     A1: Nope, keep their coop clean and they don't smell - four chickens don't create as much poop as a big dog. All animal and human waste has to be cleaned up and disposed of. The great thing is chicken waste can be composted in the backyard for use in our garden later.

Q2: Doesn't the dog bother them?
     A2: Nope again. Our dog co-exists in harmony with the chickens and even checks up on them now and then. Once we were watching an old movie that had some free-range chickens making distressed noises - our dog took off to the backyard thinking that our chickens might be in danger when it was only on the movie! All this being stated - it pays to know your dog. Some dogs can't be trusted with chickens and it is up to each of us to know our pets. Check out this story about chickens and dogs: http://communitychickens.blogspot.com/2010/08/chickens-and-dogs.html

Q3: What do your neighbours think?
      A3: Our neighbours are super supportive. We checked with them before we got the chicks to make sure they were okay with it.

Q4: Are the chickens noisy?
      A4:  Not as noisy as the neighbourhood crows and jays or riding lawn mowers and leaf blowers. Seriously though, they make very little noise but they do like to holler a bit to announce they a have laid an egg or if they sense a predator.  in general even this is pretty quiet even in our sleepy little neighbourhood.

Q5: Isn't there a by-law?
     A5: Actually there isn't an explicit by-law about chickens, however there is mention about poultry and livestock in general in the Zoning by-law. It is ambiguous enough that even our planning department wasn't sure if it prohibited chickens or not and during the Official Plan review this year they are hoping to make it more clear and chicken friendly as currently it states prohibition or raising livestock "for fur or food" on all lots 2 hectares or less. This means someone on a 5 acre country lot can't even have one chicken. We know at least dozens of people are breaching this now. However, you will be happy to know that I am permitted a tiger or elephant under the current zoning by-law.

Q6: What will you do in the winter?
     A6: We are in the process of winterizing the coop. We have installed insulation and I designed the coop with winter in mind - there is an east and a south facing window. Our chickens are a winter hardy breed.  Unless it is an unusually harsh winter we are not planning on adding a heat lamp. We will judge that when the situation arises and are going to monitor these girls closely.

Q7: Are you going to eat them?
     A7: We aren't going to eat them. We consider them our pets.

Sunday, September 12, 2010

Easy-Peasy

As I promised, here is my homemade yogurt recipe. It can be as simple or as fancy as you wish to get. If you want plain yogurt, you only need two ingredients: milk and a good yogurt for a "starter." You must begin with a Starter which has live bacteria to be grown in your milk to turn the whole thing into delicious yogurt.

The below tutorial is for the yogurt I make most often - Vanilla Yogurt. Great alone, or topped with berries, peaches or other fruit of your choice. I love it with granola and strawberries myself. If you freeze your own berries, topping this yogurt with frozen berries helps it keep great until lunch time for your kid's lunch boxes. They help keep the yogurt cold and slowly thaw out in time for lunch break. The best part about making your own yogurt is that it is so FAST and EASY.  The cooking process takes me about 15 minutes.

A note about ingredients ~ the amount of fat content in the milk will determine the thickness of your yogurt. Because of this, I compromise with 2% milk. Most often, I use skim or 1% milk when drinking and cooking, but in this case, the fat is important. If you don't mind a less dense yogurt you may by all means use a lower fat milk, or if you wish you may add even more dry milk than I call for in the below recipe.  Density of the yogurt is also why I choose to add gelatin to my yogurt sometimes (I don't when making plain yogurt or yogurt cheese). More on this at the end of this post.

Tools needed
~~~~~~~~~~~~~~~~
Yogurt maker or method to keep yogurt warm for the required time.
Large Pot
Whisk
Sink
Measuring cups / spoons


Vanilla Yogurt
~~~~~~~~~~~~~~~~
2L milk (about 8 cups)
5ml / 1 tsp gelatin powder (OPTIONAL) - available in bulk stores
250ml / 1 cup dry milk powder
1 tsp vanilla
125ml / 1/2 cup maple syrup
High quality vanilla, maple syrup, gelatin and dry milk.
50 or 60ml / 1/4 cup plain yogurt for starter (must be with live cultures!)


I like Mapleton's Organic yogurt for a starter. 


Begin with a large pot and your milk.

Pour your milk, into the pot and heat (I use high because my pot is heavy bottomed, but be careful not to burn your milk).If you are using gelatin, add now, while the milk is cold. Sprinkle over the surface of the cold milk.

Standard kitchen thermometer - needs to measure at least 30-100 degrees C.


Use a whisk to stir your milk - to keep it from sticking and browning.


Heat the milk until 82 degrees C.  The purpose of heating already pasturised milk is to kill bateria that may compete with the yogurt cultures. It may seem unnecessary, but the one time I tried to eliminate this step I did not end up with yogurt, just curds and whey! You will need to check frequently as it can heat fairly quickly on some stoves.  Whatever you do, don't leave during this part (or the next part!)


Remove from heat. Immediately put into a sink of ice water - cold water and plenty of ice. Doing this speeds up the process tremendously. This part of the process only takes about 5 minutes.  If you leave to answer the door or phone - or FOR ANY OTHER REASON - your yogurt will cool too much. Ask me how I know this. Done it. Twice. (To remedy that situation, either warm the milk back up again on the stove, or trust your yogurt maker to do so and add an appropriate amount of time to the process).
Stir the milk to help it to cool.

When it is cooling - perhaps 60 degrees, add the dry milk, vanilla and maple syrup. Check the temperature again. When you reach 40-45 degrees, remove the pot from the ice water, and add the yogurt starter. Stir thoroughly. 


Prepare your yogurt maker or method. Frankly, I consider the dependability of a yogurt maker a blessing that more than makes up for the price. However, I found a perfectly good yogurt maker at a thrift store for $2 - so purchasing one needn't be a huge investment. I use the Yogourmet brand yogurt maker because it makes large quantities that work well for my family (and controlling my portions the way *I* like).  I spent about $60 for this, but because I have been using it weekly for three years, it is worth it. Most of the other makers have single cups that you may prefer. I have read about others who use mason jars in their oven with a 100W bulb, a thermos, heating pad or even their crock pot. But you must keep the yogurt mixture warm enough to allow for the growth of good bacteria and not so warm as to kill it - ideally between 40-45 degrees C.  For the Yogourmet unit, preparation means adding warm water to the fill line (about a cup) and plugging it in.


Going in to the maker. Little frothy on top!


Close it up and now you wait. I like to wait 5 hours which I find is a bit thicker, but not too sour. Then, for this quantity, you must refrigerate for 8 hours before consuming. In my other yogurt maker which had individual cups something like this one -(it recommended 4 hours of refrigeration).

This is so delicious, I really can't describe it! The top has the froth from when I whisked the milk (just like the good store bought yogurts do), and the rest is creamy heaven.


Top with fruit, granola, or eat alone!


Gelatin in Yogurt and Other Ramblings
~~~~~~~~~~~~~~~~~~~~~~~~
This is a personal choice. If you are Vegetarian, eat Kosher or it is Haraam then obviously skip it. For the rest of you who are wondering about adding gelatin, consider the reasons gelatin-laden yogurts aren't so hot. For example, Yoplait Source yogurt, which in my opinion isn't really yogurt at all. It contains little more than a tiny amount of non-fat milk, gelatin, Splenda and "flavours" (oh wait, they claim added vitamins!). At 39 calories, you can't really consider it a food and for calcium, one would be much better off drinking a glass of non-fat milk. The gelatin is there to bulk up an inferior product - a diet food. In my case, I add a teaspoon to (2 l of milk) to help thicken a product that hasn't skimped on ingredients, rather the gelatin is adding to them. But if you don't like it - leave it out.  I could suggest that gelatin has health benefits, but at this small amount, it is unlikely that you will be getting enough to enjoy those benefits.

My Yogurt Rant

People are often surprised when I talk about homemade yogurt. They always want to know how it is made. After this rant, I promise to post my yogurt recipe with pictures - as if you need a recipe; it is so easy!

I remember back in high school, I had a math teacher who talked about making homemade yogurt. I thought he was crazy; I just couldn't imagine how homemade yogurt would taste. It sounded too healthy and just a little too "crunchy" to appeal to the me back then - why the Hell would one make yogurt anyway?

Well that was decades ago. I have changed and grown. So cliché, isn't?

How did my own yogurt making  begin? It is a long story.

A few years ago, I became SO enraged about a strange phenomenon. Yogurt is the only food product I have ever found where the smaller-sized, single-serving packaging is actually CHEAPER than the  larger-sized tub. Really, it is the only item I have found that works this way - aren't we always taught we save money on the larger sized, bulk purchase?

Grey-Bruce Public Health have a little cost comparison called "The Cost of Convenience." Mind you, most these products we don't buy ourselves and it isn't incredibly detailed, but you get the idea. Yogurt is the only item that is consistently cheaper in the single-servings. The document I linked to doesn't  explain that single serving packs in our area (since I can only comment on that) area nearly always on sale for a few dollars off. I would say that nearly every week 12 packs of yogurt are about $3.99 - the selection and brand vary, but if you aren't picky, you can pretty much count on that price when you need it. That makes a serving about $0.33.

That is only half the story too. Consider these other issues:

  • A real serving of yogurt according to Canada's Food Guide is 175g / 3/4 cup - single servings are 113g. We are being forced to eat the smaller serving by producers - who actually asked for the smaller size? I would suggest that since this reduction happened over time, it is motivated by profits and nutritional compliance, just like cereal servings (to conform to sugar, fat and other rules - something might be now low-fat, lower sugar because the serving is smaller, without the producer actually changing anything).
  • 12-packs of yogurt are not stamped with a PIC (plastics identification code). Because of this, it is not recyclable - before you respond by stating that it is picked up when you put it in your blue box, remember picking up in only part of the process, really the easy part. Once they get to the sorting centre, a large volume of items are rejected and sent to the land fill.  See McMaster University's list of non-recyclables
  • 12-packs have a greater variety of flavours and types than tubs rather than the other way around. This would indicate to me that the 12-pack is now considered the "regular" size as opposed to the larger tub.
Making yogurt myself seemed like the only way out of this for me, since writing to companies really doesn't help unless you have a gazillion others doing so as well. Making my own, I have the serving size *I* want, unlimited flavours and styles AND I don't have to recycle or throw away anything.

In the next post I will include my recipe and tutorial of making yogurt.

Friday, September 3, 2010

Update on buying challenge

Unfortunately, the challenge was, and is, much more difficult than I realised. But my reasons are not because I missed pineapples or couscous. The reason is because I actually don't do all the shopping, and perhaps I don't even do most - that in itself causes a lot of difficulty in sticking to a local first, then Canadian shopping list.

Some things my family have been eating this summer and haven't given up:
------------------------------------------------------------------------
- Candy (especially chocolate)
- Packaged foods (crackers, cookies,l granola bars - while most of these are made nearby I can't be sure of the origin of most ingredients such as wheat, corn)
- Bananas
- Olives

One thing we always have on hand because of the the Fritter business is lemon juice be cut apples from browning. We also have white sugar for making fritters as well. I can't do much about these things and having them nearby makes me inclined to use them. Something I need to work on.

For my next phase I will be stepping up the amount of shopping I do. I also am promising myself to go back to making only homemade granola and granola bars, crackers and other snacks. In order to take the pressure off DH when we have special days out (picnics), lunches etc. because I think much of the time he buys these things when I haven't had time to make homemade goodies. I also promise to cook more than I have been.

Granola Bars I make for kids lunches from a modified version of Granola Bars III from Allrecipes.com. I have reduced the sugar to a half a cup, substituted maple syrup for honey and upped it to a full cup. This makes them less sweet and more chewy. No nuts since the kids can't have them at school. I will not be putting in the chocolate in for awhile, but I will put in dried berries.


Here is a recipe for cheese crackers I tried today, which will save DH from buying boxes of goldfish or other junkie crackers. They were completely delicious and took much less time than making cookies. They literally take about 10 minutes to make plus some time in the fridge. I added some mustard seed (crushed in my mortar and pestle) for extra zip.

We don't drink pop normally, however DH buys Jones Cola's for a special treat. I admit to have a few of these when we were on holidays camping on Pelee Island. Normally, for birthdays and parties in general I will make iced tea - I will continue doing this because I think the little bit of lemon I add is much better than pop full of white sugar. (Jones at least are made with organic cane sugar - but cane sugar nonetheless).