Thursday, September 8, 2011

Zucchini Pickles

Okay, I have confirmed it - I no longer need to buy copious amounts of cucumbers to make pickles.  I tried zucchini pickles - both dills as well as bread and butter and they came out great!

I am sold. The key seems to be harvesting the zucchinis while they are still small, which of course can be difficult as zucchini can grow so quickly! I picked them at 4-8" which worked out well. Some, which were too small on the Sunday before I went away to work for the week were humongous by Friday. That is okay, I froze a bunch of grated and blanched zucchini in baggies for making zucchini bread etc. at a later time.

While I did look at some specific zucchini pickle recipes, for the most part, they didn't appear to be any different than the cucumber recipes, so for the bread and butter pickles, I used my favourite recipe from bernardin.ca


At a Crossroads....

I am at a crossroads. Many, if not most of you, will have been here too. I am here late in the game.

1. My graduate degree is pretty much finished. I submitted my MRP (masters research paper/project aka major paper) If I could just get my advisor to answer my emails, probably I would have been completely finished by now. That is a long digression that I won't bore you with. The point is, I finished my courses last spring and my major paper has been written. I may post it here, not sure yet. If not, I will post a link to it as I usually use my profile on http://www.academia.edu/ to post this sort of thing -  basically an academic version of facebook. Here is a sneak-peak:


You will notice that is isn't the typical "paper" - more like a sort of monograph. There is nothing I hate more than pointless papers sitting on a shelf. Might as well make something useful. This paper's usefulness has not yet been proven, but it is a start - I attempted to make a piece of work that could be used for something.

2. I also had a short term contract working as a development review planner for the County of Wellington - that is over too. It was great, while it lasted. I learned a lot and I worked with amazing people. I couldn't have asked for a better four months. Some might think of it as an internship - low pay, lots of work.

But now, I am supposed to be a big girl. School is over; the real work now begins.

Over the summer, while I was working on my MRP and my job, AND commuting back and forth between Meaford, Guelph and Kitchener (I was staying through the week with my mom in Kitchener), I applied to a few planner jobs. I had three interviews. Well, four since I had a second interview for one of the positions.

I heard two definitive turn downs.  But I did have an offer. There is some negotiating happening right now. In a few minutes, I will be hearing how the offer played out last night at the council (the local government of elected officials, for those of you who have a different type of local government).

Wish me luck.  It is time to see if all this school stuff can pay for itself. ;-P


Sunday, July 24, 2011

Cheese Bread

I really love cheese bread from the bakery and I was sure it would be easy to make at home.

More than ten years ago I had tried making cheese bread with the recipe which came with my bread maker and it was pretty disappointing. Because the bread maker requires you to add the cheese at some point while kneading, the cheese got too chopped up and incorporated - I preferred to see and taste the cheese in the centre.

Okay, this recipe is not a part two of the Trade Secrets post - while the recipe for cheese bread is really easy, it does require that you already know how to make bread or at least you know how to use a bread maker, as this bread could be made in the bread maker on the dough cycle. I have done this with other loaves with great success. It allows you to make a regular sized loaf in loaf pans, rather than the monster tall bread machine give-away loaves.

What I have done is to start bread dough in the bread maker, follow the regular instructions that come with the machine, then set to "dough" instead of the full "loaf" setting. When it is finished, treat as though it has just finished its first rise (although it is somewhat longer than it would have been by hand) and if you choose this way, you may proceed to those instructions when you take your dough out of the bread maker pan.

In this case, I used my KitchenAid and I used a modified version of the following recipes:
The KitchenAid Basic White Bread recipe - http://breadtopia.com/downloads/Basic_White_Bread.pdf
and
Robin Hood Canadian Cheddar Cheese Bread - http://robinhood.ca/recipe-details.aspx?rid=2789

My exact recipe I have listed below. For the most part, I used the KitchenAid recipe  and method but added 1/2 cup freshly grated Parmesan cheese, 1 beaten egg and 1 tsp Tabasco Sauce to the warm milk mixture. I proceeded in the first phase as the rest of the KitchenAid directions adding the cheese during the "shaping a loaf phase". The only other change I make is to use the larger 9 1/4 x 5 1/4 loaf pans. I had no trouble filling these babies up - the smaller ones  (8x4ish?) would have been far too small for this recipe.


After the first rise (which in this heat was 30mins but is usually more like45- 60), punch down dough. Divide in half. Roll out your dough into a 6x14" rectangle. Sprinkle with 3/4 cups of grated old or extra old (sharp) cheddar cheese. Roll up, jelly roll style,  at short end and pinch edge and ends closed. Set in greased loaf pan. Repeat for second loaf. Allow to rise until double (about 60mins).

Brush with your favourite wash - I use beaten egg and water. Sprinkle with 1/4 cup more grated cheese. Bake in preheated oven at 350 degrees for 25 mins. This works in my oven and pans, yours may prefer longer or hotter. You may wish to bake as you usually would. Bread is done when it is golden, sometimes has left sides of pan and/or sounds hollow when tapped on bottom.


RECIPE for CHEESE BREAD:
½ cup  milk
3  tablespoons sugar
2  teaspoons salt
3  tablespoons butter or margarine
1 beaten egg
1 tsp Tabasco Sauce
2   packages active dry yeast or 2 teaspoons Instant Yeast
1 ½  cup warm water (105F to 110F)
5-6  cup white unbleached flour
½ cup Parmesan Cheese
2 cups grated Old (sharp ) Cheddar Cheese - reserve ½  cup for tops of loaves
beaten egg and water for glaze

Directions:
   1. Combine milk, sugar, salt, and butter in small measuring cup. Microwave for 1 minute and then stir to dissolve sugar and incorporate; cool to lukewarm. 
   2. If using active dry yeast, dissolve yeast in warm water in warmed mixer bowl and let stand for 10 minutes.  If using Instant Yeast, just add it to the flour and mix it in before adding liquids. 
  3. Add beaten egg and Tabasco Sauce to lukewarm milk mixture. Add milk mixture to water in mixture bowl. Add 4 ½ cup flour. Attach bowl and dough hook. Turn to speed 2 and mix 1 minute. Continuing on speed 2,  add remaining flour, ½ cup at a time (slowly so it doesn’t fly out of  bowl), until dough clings to hook and cleans side of bowl. Knead on speed 2 for 2 minutes longer, or until dough is smooth and elastic. Dough will be slightly sticky to the touch.
   4. Place in a greased bowl, turning to grease top. Cover; let rise in warm place, free from draft, until doubled in bulk, about an hour.
   5. Punch dough down and divide in half. Shape each half into a loaf : roll out half the dough into a 6 x 14 rectangle and sprinkle with grated cheese. Roll up and pinch to seal. Place in a greased loaf pan. Cover; let rise in warm place, free from draft, until doubled in bulk, about 1 hour. 
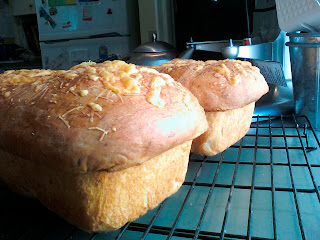
   6. Brush tops with beaten egg and water. Sprinkle with grated cheese and bake at 350 degrees F for 25 minutes. Remove from pans immediately and cool on wire racks.


Alternatively, you may wish to simply choose your favourite bread recipe and modify it by following these steps:
After the first rise, punch down dough. If you are making two loaves (5-6 cups of flour), divide in half. If not, skip that step. Roll out your dough into a 6x14" rectangle. Sprinkle with 3/4 cups of grated old or extra old (sharp) cheddar cheese. Roll up, jelly roll style,  at short end and pinch edge and ends closed. Set in greased loaf pan. Repeat if making second loaf. Allow to rise until double (about 60mins).

Brush with your favourite wash - I use beaten egg and water. Sprinkle with more grated cheese. Bake  as you do for your other loaves.

Saturday, July 9, 2011

Raised Bed Gardening

We are trying raised bed gardening this year mainly because we have no sun in the backyard due to an oversized willow tree (and a small yard). A friend suggested using the front yard and although worried at first about what our neighbours would think, we gave it a try.

Let's just say, we are LOVING it!

Our only issues where related to inexperience with this type of gardening. They are:

  1. overcrowding due to inadequate trellises  - we really didn't plan that part well
  2. shading caused by faster growing plants getting big before climbing plants have a chance
  3. organization of where plants are - too many trellis-needy plants in the same area
  4. large / fast growing plants encroaching on slower growing plants
However, things are going really well so no real worries. We will get what we get. So far we have several zucchinis, pumpkins, butternut squash and a few melons. We have eaten all our radishes and a lot of our lettuce and no new plants germinated :( We tried to plant seeds in intervals so there would be an ongoing crop but we didn't have luck with that (perhaps too hot/cold?)

here you can see our zucchini (right) taking over the whole bed (poor carrots)

somewhat full view of what is going on (with a goofy child thrown in)
Lots of sunflowers, some beans and peppers 

lettuce, pumpkins, peas and tomatoes

herbs, red cabbage, butternut squash etc...

Can you see our tiny watermelon? (lower middle)

Trade Secrets - Part I

Okay, you know how it is. People think you are amazing, you can do something and you get oos and ahhs. But truthfully, the "thing" that is getting the attention is really some simple, quick and easy secret that part of you is reluctant to tell. The other part of you wants to share how easy it is so everyone can enjoy.

I have a few of these. Things we make that get rave reviews, compliments and a bit of hero-worship when all the while it is a cinch.

Here is part one of a series of easy little projects that I have been holding back in the sharing department. Some of what I have been making and sharing on this blog is relatively easy, but a bit time consuming. This series is different.

TRADE SECRET PART ONE - Homemade Iced Cap (first method)

If you live in Canada, like me, you have probably been to Tim Hortons - you may even go daily. If you are from the US, in the northern States, you may have a Tim Hortons as well. In Canada, Tim Hortons is an ICON, even more so than Starbucks in the US. (Note, if you are from Vancouver I well understand you may have a love affair with Starbucks which rivals both that of the US and Canadians for Tim Hortons).

Canadians LOVE coffee. I read somewhere that per capita, we drink more coffee than any place in the world. Probably has something to do with Tim Hortons, our weather and availability of good quality coffees since coffee was imported.  However, a new rival has taken over - the Iced Cap. I know people who are drinking several of these a day during the warmer months. Scary actually.

If you are not familiar with the Iced Cap, it is an "iced cappuccino" made with shaved ice - like a slushy. I want to be clear here, there is no real espresso in this baby. It is made with a coffee "syrup", milk or cream and shaved ice. There are newer options, such as flavouring, whipped topping etc.  I admit to liking these myself. So much so, that I decided to try to make these at home.

Why make homemade iced caps? For a number of reasons:

  1. cheaper -  an iced cap isn't expensive, but a small is over $2 each and they can really add up
  2. faster - I don't even need to go out
  3. made with less fat and sugar - less calories
  4. saves plastic - they won't even make an Ice Cap in your cup - they will tell you then can't or make it in a plastic cup, pour it into your reusable cup and throw the disposable one away (either in front of you or where you can't see - this has happened to me several times)
  5. you know what is actually in it
  6. you can eveb make it Fair Trade if you wish to
Delicious Homemade Chocolate Iced Cap - in less than 5 mins!

A while ago we bought ourselves the groovy reusable cups (above), but we have been making homemade iced caps for several years in whatever was available. The only tool you absolutely need is a blender - we have an old-ish one that does a really great job of crushing / shaving ice and has a metal attachment. Don't worry though, the glass containers work fine as well.  The following is instructions which will make one HUGE iced cap or two small ones. Adjust to your glass size as you get used to making these.


Recipe for two:
  • Ice cubes
  • 2 rounded tsp of cocoa
  • 2 rounded tsp of instant coffee
  • 2-6 rounded tsp of sugar
  • 1- 2 cups of milk (depends on how thick you like it  - I used about 1 1/2 cups here)
If you prefer not adding chocolate - feel free to leave it out! 


I use instant coffee for this version, unsweetened cocoa, white sugar and 1% milk. You can also use cream, chocolate milk (instead of milk and cocoa - but my way is cheaper and more chocolaty) etc. In another version, I will show using real espresso. This version is still yummy, cheap and fast.

 I start with about an ice cube tray's worth of ice. We have an ice maker now on our fridge, but we used to keep a couple of extra ice cube trays just for making iced caps. Here I have used about 14 ice cubes. One thing I have learned is if you try to do too much at once, it will not work.


                                                  I pulse for one second intervals - 5-10 times. 


 This is what you will get - some crushing, with some large chunks still present. Then I turn to low speed for about 10 seconds.

   Each machine will be different, but in mine, the ice is completely crushed / shaved like snow at this point. You may need to blend a little longer  - just wait for the "quiet" as the ice becomes blended. You can pretty much hear when it is ready because the chunks of ice are a little on the loud side. When they are gone, it is quieter and ready for the next step. 

Now I scrap down the sides (usually with a spatula but it was in the dishwasher so I used a spoon)

  
 This is when I add the cocoa, instant coffee, sugar and milk. Do this to your own taste. I like mine a little on the bitter side so I don't like a lot of sugar. You absolutely do NOT need to dissolve the instant coffee and sugar in boiling water or anything. I will just mix in perfectly.

Blend for about 10 seconds for this.

Blend for another 10 seconds and it is done


Pour into whatever groovy cups you have available and voila!

  I am revising my original post to add that after drinking my own version for so long, when I have been out driving somewhere, got hot and went to Tim Horton's, I was pretty disappointed. Our homemade iced caps taste a lot richer and more coffee-like than Timmies which I also found to be too sweet.  Because you are able to customize these to your liking, you can easily make them sweeter and milder or however you wish. Add vanilla, spices - whatever strikes our fancy!

 In a subsequent post I will show another version using espresso via the following:

Wednesday, May 11, 2011

Love in the Afternoon


I haven't been writing lately. My bad. The reason is because, of course, I was busy. But in truth it really does warrant some explanation. Who isn't busy?

As most people know, I am working on my Master's degree in planning. What some don't know is that I am nearly finished. Actually, I just finished my final term of classes. Hence, the "too busy to blog" excuse.  All I have left is my major paper, which I will be working on all summer. 

But that is only the first part. The second is that I am also involved with a few volunteer activities, vaguely planning related (actually, much more than vaguely - they are all about the planning) which require monthly meetings, and some preparation and work outside the meetings.

The best part though, is part three. For the summer, although I wasn't trying initially, I got a full-time contract with the County of Wellington (a good 1 3/4 hours away) as a junior planner. In truth, it is a dream come true. Great experience, great people, a great job. And of course, experience is everything - sure the degree is helpful, but I have noticed that like all jobs, employers are desperately looking for planners with at least SOME municipal planning experience. This job is fulfilling that need. I  have learned so much in only a couple of weeks. Actually, it was power learning in the first four days. I felt like a different person.

Yes, it is rosy. I love this job. However, the downside is that during the week, I have to stay away from my family, leave all the household stuff up to Jason to make the trek down to Guelph for the week where I have been staying with my mom. Jason can do it of course, but let's not kid ourselves; having one parent away during the week is practically the equivalent for the remaining parent of single-parenthood. 

The first week was such bliss, that I hardly had time to miss anyone, but of course, there have been plenty of tears. And my weekends have been shot. Both weekends so far I have been trying to catch up on all the quality time I missed with my kids. We have been baking, cooking, hiking, cleaning, watching movies, hugging, reading....
Then there was my birthday, a great day. I got an amazing gift - a Kobo (if you don't know - where have you been? - it is an eReader). After a week of toting it around loose in my purse, it was time for a solution to protect it. So, I planned to take part of the afternoon last Saturday to make a little case for it. 


I wanted something simple, so I could have some near-instant gratification. I thought of doing something fancy which would allow me be able to read while it was still in the case, but I wasn't sure I needed to bother with something like that. So, I kept it simple. Plus, I wanted to have lots of time to spend with my kids.

No sooner had I finished it, but my son came along and asked if I would make him a case, just the same but for this iPod Touch. Of course I would. We picked out some fabric from my stash. The only thing I needed to ensure for him was that he could charge it while it was still in the case - and he can.


I was fancy enough to make a covered button for my Kobo-case, but I only because nothing I had seemed fitting. Alex's iPod case matched nicely with a button in my button box. The finishing touches - a matching hair elastic for a closure and a ribbon loop for a tag detail and voilĂ !


This just basically shows the other side - we picked out a different dog for the back. Because of the way the iPod Touch is shaped - the backside is curved and the front is flat - I padded one side and put cardboard in the other.


So now you know what I mean by "love in the afternoon" - sometimes the simplest things are a labour of love. My little guy asked - who could say no, especially when I missed him so much!


The good thing now is that I have at least one item to use as a template for different styles of cases I might make. Previously, when it was discussed in the comments of this blog (a few months ago?) I didn't have an eReader to even use to try out a case on. Sure, I could use the measurements from a bunch of websites which tell you the dimensions of the products, but it just isn't the same.  I would say something like this would take about an hour (or a bit less ) to make, so I would price something like this accordingly if I were making them for others. I think that an hour's labour would keep it reasonably affordable since it only took about a 1/3 of two fat quarters to make.

After trying it out all week - I am very happy with it. It may be useful to have a style like this one from Etsy.com where you could read it in the case like a book, but it would be a bit more labour intensive - but not much more fabric. Next time. 

Saturday, April 9, 2011

No Impact Week Thoughts

Okay, so No Impact week was a few weeks ago and I have been largely quiet. It seems to me that I should probably write something about my lessons learned. I mean, what is the point of participating if there is no intention of learning anything? Primarily, the purpose of activities like No Impact Week are to try something new,  start conversations about sustainability, resilience, consumerism, the environment etc. and to learn something about one's self. I asked myself some questions that week:

  1. What are the things I will have trouble giving up?
  2. What am I willing to give up? 
  3. What are the things I really do need?
  4. What is the most challenging carbon-intensive activity I have to deal with? 
  5. Is it all about giving something up or redefining what I want? 

Sometimes I ask myself, do I really even want things I buy or use. More often then not, the answer is no. For example, my friend is going for a coffee at break during class and asks if I want to go to, I say sure, but low and behold, I forgot my cup. Do I....

  • grab a coffee anyway; it is only one more paper cup - no biggie right?
  • grab a coffee anyway but buy another reusable cup to put it in at the same time (most coffee houses except Tim Hortons, this seems to be standard - reusable cups everywhere), I mean, I probably needed an extra cup or two right?
  • decline and spend my break going over my notes in Quantitative Techniques?
  • go along for the walk, but not buying coffee, using the time to enjoy conversation with my friend?
I have done all of these. And that might be okay too. Most of the time, I tote my cup along, but every once in awhile, I forget. Before anyone gets all radical on me spouting the evils of the coffee industry, carbon foot print and other such garblings. I know. I know too well. Coffee is one of my "vices". I admit it; I love coffee. 

If there is one thing I have learned during No Impact Week, and perhaps  well before it is that changing isn't easy. So many blogs, articles, news stories and conversation, are oriented around how easy reducing your impact is. 
  • It is so easy to recycle that can.
  • It is so easy to tote a reusable cup. 
  • It is so easy to walk to the store.
  • It is so easy to make homemade pizza.
  • It is so easy to turn down the heat, turn off the lights, not run the water....

It is easy, making small changes. And even some of the big changes. However, not all changes are easy. Remembering isn't always easy.  I remember when we were starting to carry reusable shopping bags - we often forgot and had a scenario like the above. Now we have a better system and have made it a permanent change. If we forget to bring a bag, we usually buy less, or use a box from the store or some other solution.

Sometimes we might need to take stock of the changes we have made and celebrate them. Sometimes they were hard.  If you do get around to watching No Impact Man, think about how the changes you have made are doing good. Some have been hard. Some, like carrying a reusable cup, may not have global implications (water bottles are even better see OceanGybe) but small changes are likely the ones that stick and collectively they will make a big difference. 

So many of the small changes we have been making have been poo-pooed as minute, ineffectual, insignificant.   Such as Earth Hour. No one thinks that turning off a few lights for an hour is going to change anything through the reduced consumption - it is more about the collective action of all of us participating around the world, making a statement together that we are willing to make some changes and the conversations we have with our friends during Earth Hour.  Many people have been organizing events and parties to get friends and family together over Earth Hour to use the time to have fun and learn to enjoy what a media-free, electricity-free evening offers all of us in turn of our quality of life. 

Yes, our quality of life. So much we talk about this and what we mean is "we get to have stuff" - that is not the meaning of quality of life. Quality of life is the ability to feed, clothe and shelter yourself and family and have some leisure time to enjoy the richness of experience life has to offer. Quality of life might be seen in community volunteers, ability to go for a walk in a park or read a good book. 

Quality of life does not mean spending four hours a day on the 401 hwy commuting to work so that you can have that big screen tv or second SUV. It is not putting your kids in extra activities to avoid actually interacting with them. It is not eating fast food, golfing everyday or wearing Prada. 

One can have a high quality of life without raping the environment, or engaging in excessive consumerism. 

So, No Impact Week I also spent a lot of time thinking about quality of life. Isn't that what we are all after?  My two biggest self reflections for No Impact Week were about how to celebrate our successes and define what we really believe is our quality of life. If it isn't important to me - it can go. Cut it loose. 


Sunday, April 3, 2011

Eggs Update

Our four hens have now laid 702 eggs since they started laying, which was the end of August. That was 32 weeks ago! They reached full production in mid September, about 29 weeks ago.

They are into their high season again and are laying at full capacity -  more than they were a few weeks ago in the coldest part of winter. By the way, they laid eggs all through the winter and there was never a day with no eggs - usually there were at least two - so pay no attention to those who would tell you that they don't lay in the winter! These ladies have done really well and we have enjoyed having them!

Friday, April 1, 2011

Pizza Day

Pizza Day is a great day. We don't reserve pizza for Saturday night.

Hey, dinner was ready by 7pm; it's all good.

Sunday, March 27, 2011

Make it at home - Doughnuts

Who knew? Doughnuts, like bread, are dead easy to make.  It can  be done using a breadmaker or traditional kneading/rising method.

The hardest part about making doughnuts, is finding non-GMO frying oil. Let me know if you have found a way to access gallons upon gallons of organic canola oil. Don't worry, we aren't crazy; we don't usually deep fry our foods, but for a special treat and for our apple fritter "business," c'est bien.

Okay, I know the recipes I put up on here are mainly treats.  Coincidence? I think not. I love treats. I admit to having a sweet tooth (and a cheese tooth!). I like making treats for my family as well as the healthy stuff. I think my reasoning for making treats at home is that treats should be, well, a treat. We shouldn't eat them everyday, and unfortunately these days, we do (as a society, hello, I don't mean we ALL do!). Treat foods, such as French fries, burgers, candy, chocolate, pastries and of course, doughnuts, are eaten daily. No wonder we are getting fat as a nation.  Many writers and cooks I have been following over the years are making a move out of mainstream foods altogether, including things like doughnuts. I am not prepared to eat only seaweed and sprouts - when we do that aren't we bound to fail?
Lovely Doughnut and "Hole"

There are plenty of recipes online, such as one at Allrecipes.com Crispy and Creamy (which looks amazing), but here is one I used adapted from Women's Home Companion Cook Book, 1944. I have separated the directions into two methods - proceed as you will. I admit to adapting this for my breadmaker. I have nasty carpal tunnel in my wrist and I have to watch how much kneading I do. The original recipe calls for a yeast cake and had subsequent activation directions. Since I just threw the ingredients into my breadmaker, I am ASSUMING that you could just adapt the same way for instant yeast without a breadmaker. I didn't test this, so if you are an experienced traditional bread baker and it doesn't make sense to you - by all means, adapt for your needs! Please let me know if I have made an error.

RAISED DOUGHNUTS

Traditional Method
2 1/4 tsp/1 pkg yeast
1/4 c lukewarm water
3/4 c scalded milk. cooled to lukewarm
4 c flour, sifted
3/4 c sugar (any type may be used including white, organic cane, maple sugar etc.)
2 eggs, well beaten
1/2 c melted shortening (of our choice - unsalted butter may be used)
1/4 tsp, ground nutmeg
1/2 tsp salt

Start yeast in water and milk. stir in eggs and shortening. Combine flour, sugar, salt and nutmeg and add to liquid.  Beat 10-15 mins by hand or 4-5 mins with electric mixer. Cover, set in warm place and let rise 1 hour or until doubled.

See combined directions for part two.

Breadmaker Method
3/4 c milk (scalded and cooled)
1/2 melted shortening (of our choice - unsalted butter may be used)
1/4 c water
2 eggs, well beaten
1/2 tsp salt
4 c flour
3/4 c sugar (any type may be used including white, organic cane, maple sugar etc.)
1/4 tsp ground nutmeg (optional)
2 1/4 tsp (or one package)  instant yeast

Scald milk (may heat in microwave for two minutes) and add the shortening to melt. Add water, cool to lukewarm.  Add ingredients in order your breadmaker recommends. Set to dough setting.  Proceed as for the combined instructions.

Combined instructions / part two
Turn dough onto floured board. Roll out to 1 inch thickness and cut out with doughnut cutter (or in my case a combination biscuit cutter and  apple corer!).   Set on floured board in warm place until double in size.

Heat frying oil  to 365-375F in deep pot (about two inches is sufficient) or use standard deep fryer.  Drop doughnuts in hot oil and cook until golden, about 2-3 minutes, turning halfway. Drain on paper towels or rack. Dust with sugar or glaze of your choice.

Doughnut Glaze

  • 1/3 c butter
  • 2 c powdered sugar
  • 1 1/2 tsp vanilla
  • 4 tbsp hot water or as needed

Melt butter in a saucepan over medium heat. Stir in powdered sugar and vanilla until smooth. Remove from heat, and stir in hot water one tablespoon at a time until the icing is somewhat thin, but not watery. Dip warm doughnuts into glaze and set on rack to dry.

Friday, March 25, 2011

Twitter temporarily down...

It seems that Twitter was temporarily in overload as the news of the vote of non-confidence in parliament today.

For a few minutes, Twitter was down - probably in response to so many people tweeting on  the vote and the impending upcoming election.

No Impact Week - Progress Report

Okay, I cheated.

Everything has been going well (except that my daughter told me this morning that she can't wait for Sunday - I ask why and she told me that "veggie week will be over"  - what do you say to that!?). The problem was I felt guilty about two things yesterday.

First, I had to take a 6 hour drive yesterday to London and back for a school activity. There wasn't much I could do about this, but I look forward to the time when I won't have to do these sorts of things (although I had a great day!)

Second, I had take-out Chinese. I know, my bad. It wasn't my idea. We decided to take advantage of the fact that we were in Kitchener on the way home last night to drop in on my daughter and her growing family. Next thing we knew we were invited to share their dinner of Chinese take-out. I could have said no thank you and left, but since it was dinner time and we wanted to continue with our visit, we partook.

So, we lapsed. What will I do to make amends?

Wednesday, March 23, 2011

No Impact Week

This week is No Impact Week at a few universities. I took the liberty of signing myself and family up. Aren't  I considerate?

No, I did not ask them what they thought or if they wanted to participate. Like a good "radical," I simply told them we were participating.

In truth, I realise I am hardly radical. I am not too far from mainstream really. That is the sad part. I am striving to be a better consumer by NOT consuming.

We kicked things off by watching the documentary "No Impact Man" on Netflix.

Curiously, there are a lot of documentaries on Netflix, and despite what some people have heard, a lot of great shows and movies. Admittedly, some of them are already available online, but if you are watching on TV with a WII or other device, Netflix does make it easier. But, forgive me as I digress.

Our challenges this week for our family are:
  • No meat
  • Reduce dairy
  • No convenience or processed foods (not a usual behaviour anyway for us)
  • Don't buy anything new
  • Turn off electronics through power bars at night
  • Have a fun evening by candle light during "earth hour" by making it three hours
Things we can't change this week:
  • Travel by car - I have to drive several long trips this week due to school, volunteer and professional activities
  • Alternative family activities - because of above, I will be absent several evenings this week, but the weekend is still available!
I know really in most ways we are pretty mainstream, but here is a list of some things we have already undertaken on a more permanent basis:
  • Litterless lunches (doing since 1992!)
  • Three R's in order - Reduce first, then reuse... lot's of people brag about their amazing recycling, but when you look in their bin you can see they buy a LOT of packaged stuff. Would have been better to not buy that stuff at all!
  • Buying used items at thrift stores over new when possible
  • Composting -backyard and municipal depending on our volume
  • Making purchasing choices based on reducing packaging (buying in bulk, buying from certain companies, making yogurt ourselves etc.)
  • Canning our own food - while not as efficient as a factory, it allows us to reuse packaging (jars) and be more food concious (we would never waste what we put our hard work into)
  • Cooking! (rather than fast food and eating out)
  • Eating "whole foods" not processed
  • Backyard vegetable garden
  • Not cutting our grass often - using an electric mower over gas (push would be better!)
  • Rain water collection for gardens
  • Making handmade gifts for Christmas and Birthdays
  • Buying from a CSA for meat and veg (when we can afford to)
  • Buying Local food / Shopping at a local food store and the farmers' market
  • Eating seasonally for most food products- never buying an imported food if a local one is available
  • Environmentally safe cleaning products (vinegar, water, natural soap, baking soda, some natural purchased laundry products)
  • Carrying reusable cups for hot and cold drinks on the road
  • Backyard chickens! (reminds about the food system, helps us with a holistic garden system, reduces our waste - we feed it to the hens, each egg is precious!)
I don't think this is anywhere near an exhaustive list. And, though it is a good start - there are a lot of other things we could do. Especially in terms of electricity. We haven't made the move to become vegetarian either, however we don't eat a lot of meat and what we do eat is mostly local and pastured.  I am not ready to move into vegetarianism yet, but who knows...it might be next?

Tuesday, January 25, 2011

I Hate to Commute

Life in a rural place - it gets pretty tricky. If you are in a city right now, there may be some things you take for granted, like public transportation. Something that pretty much doesn't exist for rural areas.

Maybe you don't use public transportation now. But with gas prices always going up, the environment going to hell, and traffic congestion, chances are you might be very soon.

It is not that I hate driving or even that I feel bad about the emissions (okay, I do but, sometimes it is a necessary evil).  The truth is, I hate winter driving AND I hate wasting time.

Wait, that isn't right. I don't mind "wasting" time if it is something I kind of want to do. Like watching a movie, lying in a hammock, napping, web-surfing. You know. I guess some people would call those things "relaxing." Not really doing anything exactly USEFUL, yet not quite a waste of time.

Driving can sometimes seem like a complete waste of time. Truth is, if housing  prices weren't so outrageous in Guelph, we would be living there right now. Don't get me wrong; I don't mean to suggest I would RATHER live in Guelph (no offence to Guelph at all - it is a really great city).  I wouldn't rather live anywhere else than right here. However, once again, if housing wasn't so outrageous, we would have moved from Waterloo to Guelph in 2009. That is when I finished my Bachelor's at University of Waterloo (which only took me 16 years to complete! Wait, I took some time off in between - I wasn't working on it the whole time. Sheesh...even I am not that slow. Well, maybe I am. I digress...). We moved down to Waterloo, Ontario from Meaford, Ontario in 2008 so I could go to school full time and it would be easier with me right there. In fact, we lived in the student residence for families.

When we first left, I didn't intend then to start a graduate degree. But things change and we had tried to move to Guelph for my two year masters degree, but we simply couldn't afford it. Yes, it is even more expensive than Kitchener/Waterloo! So we moved back to Meaford, with the intention that I would take the Greyhound to University of Guelph. Only, there was a problem - Greyhound reduced, then pretty much cancelled, the direct route to Guelph from Owen Sound. If you want to regularly commute - you need to take a 7 hour ride through Toronto. What was a 2 hour ride is now 7!

To be clear, there is some service through Aboutown Routes, but it only really goes Sunday and Mondays. True, I could combine that with the rare Greyhound trip - but it is complicated. Frankly, it doesn't really work unless I basically want to only come home once in a blue moon. Or take 7 hour bus rides.

So, what is worse - driving 7 hours per week  (a waste of valuable time) OR ride a bus for 14 hours per week (and one which is almost trying to make us NOT make use of it) and never see my family?
Monday's Commute - south of Damascus, Ontario - Wellington Rd 16.
I chose to drive. Not always sure I made the right choice, but either way I am nearly finished my degree. I keep driving for the next few months. It will be over soon. I hope. Back to my nap.

Tuesday, January 18, 2011

I DID it; I Made a Doll!

It turns out, all I had to do is ask. 

"Hey, do you feel like sewing something with me? I am thinking of making a doll." asks mom. 
"Sure!" Allison answered enthusiastically, "When, now?"

It  is true, Saturday afternoon and Sunday morning we worked on a doll-making project. It was an easy one too - I wasn't ready for a plethora of pieces and tiny stitching. I needed something a little easier.

I had a pattern picked out for some time. Several months ago (perhaps years) I had found this pattern at MarthaStewart.com. It seemed to be just what I wanted to make - basically a girl doll, not a baby. 
I thought the patterns were pretty good. There are printable patterns for the doll, pants, shirt and coat.  I made the shirt into a jacket and made a sleeveless top for under it. 

The instructions are just "okay." I think if you were a beginning sewer, you could get a bit frustrated or stuck with their lack of detail. There were a couple of parts I sewed the way I wanted to because I just didn't "get" what the instructions where saying.  The hair especially I thought was not explained well - and this is a part that can really go wrong! I re-did the hair as it was. 

First, I cut several strands of cotton yarn (this wasn't the smooth type as you can see, but almost like a bouclĂ© - not sure what it was exactly as it was just in my stash with no label!) to a length that I though would be nice for long hair. Then I laid them out flat about one strand thick and pushed them through my sewing machine - about down the middle (I knew I could trim it latter to make it even as long as there was enough). When it went through it gave the appearance of long hair with a centre "part."   As it turned out, this didn't create enough hair - she would be bald if it moved just a certain way. So, I did this again twice more, to create three layers of hair. Then I hand stitched it on her head and sewing down to the neck. For the bangs, I did the same thing, but with short strands. Then I folded it in half along the sewn line and turned it perpendicular. I sewed that down too. 

Understand, I know absolutely nothing about making dolls. I looked online a bit previously, so I have seen what others have done here and there, but that is about it. If you are doing this - make the hair however you wish!

Of course, she needed somewhere to sleep, so we made a sleeping bag and pillow.


And of course, a nightgown.
I modified the coat pattern they provided by only using the back piece and angling it from the underarm seams outwards rather than the straight side seams. I lengthened it somewhat as well, to make a longer gown. The gown is 2x2 rib knit with lingerie elastic for trim. Thankfully, it stretches easily over her head.

Sunday, we made a hat, mitts, socks and a lovely "wool" coat. Then I knitted an I-cord on the Knifty Knitter for a scarf.  Of course, she needed pom-poms for her hat. The socks are made by using the tip of a child's sock, cutting in half and sewing back up to make a new tube sock.


She looks a bit weird as she is perched on a doll chair that is a bit too small for her. Obviously, she needed a bag to carry her stuff in too. I have lots of little pieces of ribbon left over from making "Taggies" copies for baby gifts - a bit of ribbon made this bag perfect! (Anyone reading this would know there is NO WAY I would pay $20+ for a piece of fabric with some ribbon on it even if I thought it was a great idea).

I forgot to mention the best part - the doll was made almost entirely out of scraps destined for the trash. Her hat, socks and mitts are from a lone sock left over from a previous project. Her body was made of a cotton muslin scrap that I had been using to test stitches as I changed threads on my serger.  This would be a great project to re-purpose old clothing that was beyond repair. I am thinking jeans with tears, socks with holes or orphaned, scrap yarn remnants etc.

The best part was catching up on some overdue girls time together.

Tuesday, January 11, 2011

Funny Little Projects and UFO's

I have always wanted to make doll clothes and accessories. I am even more interested in doll-making -even though my Mother in Law warned me that sewing doll things isn't that fun (especially for Barbie).

The problems is I haven't really had much of a chance to sew doll stuff. Yes, I have two daughters, but neither one of them have been too interested in dolls. This is a bit strange too, for Allison, since she is especially "girly".

For one of my sons I made a doll diaper (it had trucks on it), a sleeper and a fleece sweater for when he was expecting a new baby sibling (he was a preschooler then). He played with the doll as we prepared for the new baby. I thought it would be a good transition for him. He did outgrow it though. By school age the doll was history.

 I made this pattern ~ Butterick 4027 (out of print)
It turned out okay. Nothing spectacular - but I never really found out if the child enjoyed it - it was made for a gift. I never saw anyone playing with it. If memory serves me, I chose to make a backpack with a changing pad attached, like a diaper bag, rather than the case.  I don't think I made two dolls either.

However, that was years ago - at least 9. I can barely remember the whole thing. What does remind me once in awhile is when I open up my sewing supplies and start going through them. There is the doll pattern piece from the above pinned to a flesh-coloured bit of broadcloth - must have been waiting since way back when I intended to make a similar set for someone or other. This leads me to my next issue. UFO's (unfinished objects). My stash is full of 'um. 

For example:

 I have a bag with cut out pieces for a couple of puppets from yet another out-of-print pattern. 
 

Since I started it, Kwik Sew came out with a newer, pretty pattern. Which I just had to have. Unfortunately, my kids are almost too old for puppets.


I have plenty of other UFO's kicking around in boxes and bags. Among these include:
1. Baby Quilt - my granddaughter is now 3! - needs only one side of binding finished :(
2. Queen Sized bed quilt - for my bed - squares are pieced (simple star) but not put together into a quilt top
3. McCall Blouse with flounce neckline and bell sleeves (also out of print) - only cut out, nothing is together!
4. Pirate Ship fort - ties onto bunk bed to make lower part the fort (needs ties, more decorations)
5. Kwik Sew Skirt for me (needs hemmed)
6. Loomed shawl/scarf - for me (needs to be about 2' longer!)
7. Loomed dish towel  - for someone (needs a few more inches)

and the worst of all....

8. Log Cabin quilt for my son (now 10!) for his crib/toddler bed. 

This one warrants an explanation. It is large enough to TUCK in on a toddler bed. The top is done - but I got stuck on the actual quilting part. I tried machine quilting it (free motion) and it didn't move very well under the foot so that the stitches are really small. Nearly impossible to pull out. I recently found and rescued this - I worked on stitch ripping for awhile, but there is so much more to go. I have the chance now to give it to my granddaughter who will be born in February. 

No kidding. It is completely true. A number of projects above need about 30 minutes of time and attention. Some need hours. This isn't a complete list  - I have no idea what is all there really. Especially when you consider all the fabric and patterns I have that aren't cut. 

Despite what it looks like - I do finish projects too. Plenty. But it appears I also have a short attention span. It something takes too long, or there is too long between working sessions on a project, I lose momentum. 

Back to the FUNNY LITTLE PROJECTS. My newest are these little doll diapers:


I think dolls can be great, but I am not a fan of dolls that DO things. Or take batteries. However, for Christmas my granddaughter got a Baby Alive.  Baby Alive isn't new - I remember Baby Alive when I was a kid.  Baby Alive now days not only drinks, eats, wets but it takes batteries. But that isn't the best part. Baby Alive disposable diapers cost $10 for 6!!!!!

That is not a misprint. My granddaughter and daughter played with this doll on Christmas and they used 2.  Now, I am pretty sure that if they are only wet, you can hang them up to dry and reuse them (at least a few times). However at some point they will need replaced, so I decided to make some out of cloth scraps by stretching out and tracing one of the wet diapers (after drying out of course). Since I made lots of real cloth diapers, I used familiar methods. The blue and yellow ones are exactly the same size as the original disposable diaper. The two white prints I shaped a bit by rounding out the corners and bound with white fold-over elastic. All of these should be functional and have soakers since Baby Alive wets. If you are thinking of making diapers for a regular doll (that doesn't wet) they you can skip that part. I hope Baby Alive doesn't we SO much that a waterproof cover is needed, but if so, I could make a couple of those too. If you plan on making a diaper for a Baby Alive doll and you aren't planning on taking any chances, you could make an "AIO" (All in One) style diaper right off the bat. This would just require a waterproof layer for the outside, such as rain coat fabric or PUL (polyurethane-laminate used in covers diaper covers) Better yet, make a cover out of a scratchy unused wool sweater - add lanolin and your done! I am sure the doll won't  mind.


These pictures are deceiving - I should have put my hand in there or another object for comparison as these diapers are only about 4" wide. 


Anyway, it is nice to finish funny little projects. UFO's are a pain in my butt.