Monday, October 25, 2010

Winterizing the Chicken Coop

We are almost finished getting our coop ready for winter.  We now have about an R-11. Not perfect, but better than the R-1.75 our plywood was previously! We added blue panel insulation and another inner wall-board.  I still need to paint - but it may have to wait until after the winter if the weather doesn't hold out. Soon it will likely be too cold to paint. Plus I want it to be dry so it will be good for our ladies to sleep in that night. 


Here is the inside - we now have two roosts.
 One at 18' and one at 28". 

The thermometer is obviously so we can keep an eye on the inside temperature.
  Here is a view from the opposite side - facing south.
 Looks like someone is in need of privacy! Soon after she laid a lovely perfect egg.


Yay! The "finished product" as it now stands. We realised their run was far too small and they needed more room. We have had to contain them in their coop and run more often for their own safety as our little yard fence in some spots is only 3'  and one day another dog got in our yard! Thankfully, our dog came charging out (likely to play) and scared the other dog away. Phew!  So, we added a dog run to the side which is 6' high and 7x13' which gives them a total of 129 sq ft in their run to play and scratch.  We will add some aviary netting on top of the run to help keep predators out.  We try to be diligent about putting the ladies away promptly at night as their new run extension is NOT predator proof.

Friday, October 15, 2010

Secret Projects

It turns out I am about to have one of my wishes. I am working on a very special project for Hallowe'en that I have always wanted to do but never got around to it. Period Costumes.

I won't say what period now, but as time rolls by I will post some hints and pictures. My husband and I are going as a pair if that is any hint.

Wish me luck as I haven't had my sewing machines out for awhile.

Yes, I should be working on term papers and such. But sewing is much more fun. With some luck (and planning) I will get to the papers in due time. :)

Wednesday, October 13, 2010

Little Baby Gifts

I am not much of a knitter. I only remember finishing one needle knit project in my life which was a scarf from a kit my son got for Christmas. He got bored knitting after a few rows, so I finished it for him.

All that stated - I love knitting on the knifty knitter. I would say that perhaps I am addicted to loom knitting and I would love to start knitting socks.
I made this little hat for my new niece Evangeline. She is nearly one month and to be honest, this hat JUST fits. She will likely wear it a month and that's it.  So, truly it is a newborn hat.  I used the Knifty Knitter red loom, two strands of worsted weight 100% wool.  I based it on combining a pattern for a gorgeous needle knit berry hat and an apple hat pattern with a standard Knifty Knitter hat.  I used a 1 over 2 stitch in an e-wrap. The sizing it important because I have read the smallest loom is for newborn hats, but I can attest this will not work as this is what I use for mittens. Also, the red loom is written to be for children 2-5. Wrong again. Firstly children 1 and up have big heads - babies' heads double in size the first year.  I have used the green loom for children 2 and up quite easily. 

I apologise for the strange background for the hat. I snapped this before popping it into the bag and arriving at our Thanksgiving destination.

Eggs, Eggs, and more Eggs...

My girls have been busy.

Some people who have no knowledge of backyard chickens, or chickens in general, might be wondering how many eggs these ladies will lay. I was one of those people only a few months ago and I am still learning every day.

Well, it seems Barred Rocks lay plenty. My girls have now produced 12 dozen eggs as of  this Sunday. That is 11 dozen eggs in only 5 weeks from only 4 hens.  At full production we are now getting a dozen about every three days.

Now, I realise that their laying will reduce in the winter, but for now we are enjoying the delicious eggs we are getting every day which is a bonus most pets don't provide. That is right, I wrote pets because, after all, that is what they are.
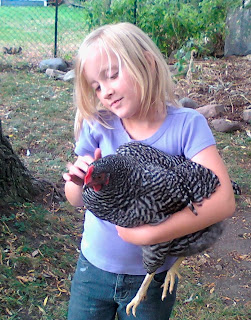
Allison with Dot.

We enjoyed Canadian Thanksgiving this past weekend. Family, food and fellowship. Now that sounds Christian! Some of my family members asked the same questions everyone asks of us when they find out we have chickens in the back yard.

For your amusement, here is a list of FAQ's I created from our conversations this weekend.

On keeping chickens in the backyard:
------------------------------------------------

Q1: Don't they smell?
     A1: Nope, keep their coop clean and they don't smell - four chickens don't create as much poop as a big dog. All animal and human waste has to be cleaned up and disposed of. The great thing is chicken waste can be composted in the backyard for use in our garden later.

Q2: Doesn't the dog bother them?
     A2: Nope again. Our dog co-exists in harmony with the chickens and even checks up on them now and then. Once we were watching an old movie that had some free-range chickens making distressed noises - our dog took off to the backyard thinking that our chickens might be in danger when it was only on the movie! All this being stated - it pays to know your dog. Some dogs can't be trusted with chickens and it is up to each of us to know our pets. Check out this story about chickens and dogs: http://communitychickens.blogspot.com/2010/08/chickens-and-dogs.html

Q3: What do your neighbours think?
      A3: Our neighbours are super supportive. We checked with them before we got the chicks to make sure they were okay with it.

Q4: Are the chickens noisy?
      A4:  Not as noisy as the neighbourhood crows and jays or riding lawn mowers and leaf blowers. Seriously though, they make very little noise but they do like to holler a bit to announce they a have laid an egg or if they sense a predator.  in general even this is pretty quiet even in our sleepy little neighbourhood.

Q5: Isn't there a by-law?
     A5: Actually there isn't an explicit by-law about chickens, however there is mention about poultry and livestock in general in the Zoning by-law. It is ambiguous enough that even our planning department wasn't sure if it prohibited chickens or not and during the Official Plan review this year they are hoping to make it more clear and chicken friendly as currently it states prohibition or raising livestock "for fur or food" on all lots 2 hectares or less. This means someone on a 5 acre country lot can't even have one chicken. We know at least dozens of people are breaching this now. However, you will be happy to know that I am permitted a tiger or elephant under the current zoning by-law.

Q6: What will you do in the winter?
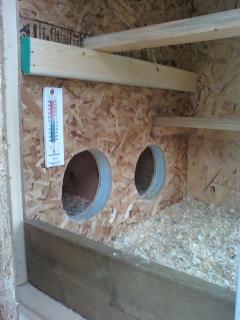
     A6: We are in the process of winterizing the coop. We have installed insulation and I designed the coop with winter in mind - there is an east and a south facing window. Our chickens are a winter hardy breed.  Unless it is an unusually harsh winter we are not planning on adding a heat lamp. We will judge that when the situation arises and are going to monitor these girls closely.

Q7: Are you going to eat them?
     A7: We aren't going to eat them. We consider them our pets.
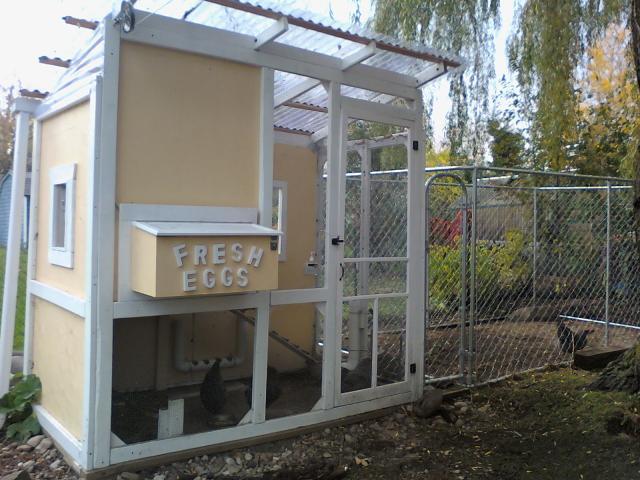
Sunday, September 12, 2010

Easy-Peasy

As I promised, here is my homemade yogurt recipe. It can be as simple or as fancy as you wish to get. If you want plain yogurt, you only need two ingredients: milk and a good yogurt for a "starter." You must begin with a Starter which has live bacteria to be grown in your milk to turn the whole thing into delicious yogurt.

The below tutorial is for the yogurt I make most often - Vanilla Yogurt. Great alone, or topped with berries, peaches or other fruit of your choice. I love it with granola and strawberries myself. If you freeze your own berries, topping this yogurt with frozen berries helps it keep great until lunch time for your kid's lunch boxes. They help keep the yogurt cold and slowly thaw out in time for lunch break. The best part about making your own yogurt is that it is so FAST and EASY.  The cooking process takes me about 15 minutes.

A note about ingredients ~ the amount of fat content in the milk will determine the thickness of your yogurt. Because of this, I compromise with 2% milk. Most often, I use skim or 1% milk when drinking and cooking, but in this case, the fat is important. If you don't mind a less dense yogurt you may by all means use a lower fat milk, or if you wish you may add even more dry milk than I call for in the below recipe.  Density of the yogurt is also why I choose to add gelatin to my yogurt sometimes (I don't when making plain yogurt or yogurt cheese). More on this at the end of this post.

Tools needed
~~~~~~~~~~~~~~~~
Yogurt maker or method to keep yogurt warm for the required time.
Large Pot
Whisk
Sink
Measuring cups / spoons


Vanilla Yogurt
~~~~~~~~~~~~~~~~
2L milk (about 8 cups)
5ml / 1 tsp gelatin powder (OPTIONAL) - available in bulk stores
250ml / 1 cup dry milk powder
1 tsp vanilla
125ml / 1/2 cup maple syrup
High quality vanilla, maple syrup, gelatin and dry milk.
50 or 60ml / 1/4 cup plain yogurt for starter (must be with live cultures!)


I like Mapleton's Organic yogurt for a starter. 


Begin with a large pot and your milk.

Pour your milk, into the pot and heat (I use high because my pot is heavy bottomed, but be careful not to burn your milk).If you are using gelatin, add now, while the milk is cold. Sprinkle over the surface of the cold milk.

Standard kitchen thermometer - needs to measure at least 30-100 degrees C.


Use a whisk to stir your milk - to keep it from sticking and browning.


Heat the milk until 82 degrees C.  The purpose of heating already pasturised milk is to kill bateria that may compete with the yogurt cultures. It may seem unnecessary, but the one time I tried to eliminate this step I did not end up with yogurt, just curds and whey! You will need to check frequently as it can heat fairly quickly on some stoves.  Whatever you do, don't leave during this part (or the next part!)


Remove from heat. Immediately put into a sink of ice water - cold water and plenty of ice. Doing this speeds up the process tremendously. This part of the process only takes about 5 minutes.  If you leave to answer the door or phone - or FOR ANY OTHER REASON - your yogurt will cool too much. Ask me how I know this. Done it. Twice. (To remedy that situation, either warm the milk back up again on the stove, or trust your yogurt maker to do so and add an appropriate amount of time to the process).
Stir the milk to help it to cool.

When it is cooling - perhaps 60 degrees, add the dry milk, vanilla and maple syrup. Check the temperature again. When you reach 40-45 degrees, remove the pot from the ice water, and add the yogurt starter. Stir thoroughly. 


Prepare your yogurt maker or method. Frankly, I consider the dependability of a yogurt maker a blessing that more than makes up for the price. However, I found a perfectly good yogurt maker at a thrift store for $2 - so purchasing one needn't be a huge investment. I use the Yogourmet brand yogurt maker because it makes large quantities that work well for my family (and controlling my portions the way *I* like).  I spent about $60 for this, but because I have been using it weekly for three years, it is worth it. Most of the other makers have single cups that you may prefer. I have read about others who use mason jars in their oven with a 100W bulb, a thermos, heating pad or even their crock pot. But you must keep the yogurt mixture warm enough to allow for the growth of good bacteria and not so warm as to kill it - ideally between 40-45 degrees C.  For the Yogourmet unit, preparation means adding warm water to the fill line (about a cup) and plugging it in.


Going in to the maker. Little frothy on top!


Close it up and now you wait. I like to wait 5 hours which I find is a bit thicker, but not too sour. Then, for this quantity, you must refrigerate for 8 hours before consuming. In my other yogurt maker which had individual cups something like this one -(it recommended 4 hours of refrigeration).

This is so delicious, I really can't describe it! The top has the froth from when I whisked the milk (just like the good store bought yogurts do), and the rest is creamy heaven.


Top with fruit, granola, or eat alone!


Gelatin in Yogurt and Other Ramblings
~~~~~~~~~~~~~~~~~~~~~~~~
This is a personal choice. If you are Vegetarian, eat Kosher or it is Haraam then obviously skip it. For the rest of you who are wondering about adding gelatin, consider the reasons gelatin-laden yogurts aren't so hot. For example, Yoplait Source yogurt, which in my opinion isn't really yogurt at all. It contains little more than a tiny amount of non-fat milk, gelatin, Splenda and "flavours" (oh wait, they claim added vitamins!). At 39 calories, you can't really consider it a food and for calcium, one would be much better off drinking a glass of non-fat milk. The gelatin is there to bulk up an inferior product - a diet food. In my case, I add a teaspoon to (2 l of milk) to help thicken a product that hasn't skimped on ingredients, rather the gelatin is adding to them. But if you don't like it - leave it out.  I could suggest that gelatin has health benefits, but at this small amount, it is unlikely that you will be getting enough to enjoy those benefits.

My Yogurt Rant

People are often surprised when I talk about homemade yogurt. They always want to know how it is made. After this rant, I promise to post my yogurt recipe with pictures - as if you need a recipe; it is so easy!

I remember back in high school, I had a math teacher who talked about making homemade yogurt. I thought he was crazy; I just couldn't imagine how homemade yogurt would taste. It sounded too healthy and just a little too "crunchy" to appeal to the me back then - why the Hell would one make yogurt anyway?

Well that was decades ago. I have changed and grown. So cliché, isn't?

How did my own yogurt making  begin? It is a long story.

A few years ago, I became SO enraged about a strange phenomenon. Yogurt is the only food product I have ever found where the smaller-sized, single-serving packaging is actually CHEAPER than the  larger-sized tub. Really, it is the only item I have found that works this way - aren't we always taught we save money on the larger sized, bulk purchase?

Grey-Bruce Public Health have a little cost comparison called "The Cost of Convenience." Mind you, most these products we don't buy ourselves and it isn't incredibly detailed, but you get the idea. Yogurt is the only item that is consistently cheaper in the single-servings. The document I linked to doesn't  explain that single serving packs in our area (since I can only comment on that) area nearly always on sale for a few dollars off. I would say that nearly every week 12 packs of yogurt are about $3.99 - the selection and brand vary, but if you aren't picky, you can pretty much count on that price when you need it. That makes a serving about $0.33.

That is only half the story too. Consider these other issues:

  • A real serving of yogurt according to Canada's Food Guide is 175g / 3/4 cup - single servings are 113g. We are being forced to eat the smaller serving by producers - who actually asked for the smaller size? I would suggest that since this reduction happened over time, it is motivated by profits and nutritional compliance, just like cereal servings (to conform to sugar, fat and other rules - something might be now low-fat, lower sugar because the serving is smaller, without the producer actually changing anything).
  • 12-packs of yogurt are not stamped with a PIC (plastics identification code). Because of this, it is not recyclable - before you respond by stating that it is picked up when you put it in your blue box, remember picking up in only part of the process, really the easy part. Once they get to the sorting centre, a large volume of items are rejected and sent to the land fill.  See McMaster University's list of non-recyclables
  • 12-packs have a greater variety of flavours and types than tubs rather than the other way around. This would indicate to me that the 12-pack is now considered the "regular" size as opposed to the larger tub.
Making yogurt myself seemed like the only way out of this for me, since writing to companies really doesn't help unless you have a gazillion others doing so as well. Making my own, I have the serving size *I* want, unlimited flavours and styles AND I don't have to recycle or throw away anything.

In the next post I will include my recipe and tutorial of making yogurt.

Friday, September 3, 2010

Update on buying challenge

Unfortunately, the challenge was, and is, much more difficult than I realised. But my reasons are not because I missed pineapples or couscous. The reason is because I actually don't do all the shopping, and perhaps I don't even do most - that in itself causes a lot of difficulty in sticking to a local first, then Canadian shopping list.

Some things my family have been eating this summer and haven't given up:
------------------------------------------------------------------------
- Candy (especially chocolate)
- Packaged foods (crackers, cookies,l granola bars - while most of these are made nearby I can't be sure of the origin of most ingredients such as wheat, corn)
- Bananas
- Olives

One thing we always have on hand because of the the Fritter business is lemon juice be cut apples from browning. We also have white sugar for making fritters as well. I can't do much about these things and having them nearby makes me inclined to use them. Something I need to work on.

For my next phase I will be stepping up the amount of shopping I do. I also am promising myself to go back to making only homemade granola and granola bars, crackers and other snacks. In order to take the pressure off DH when we have special days out (picnics), lunches etc. because I think much of the time he buys these things when I haven't had time to make homemade goodies. I also promise to cook more than I have been.

Granola Bars I make for kids lunches from a modified version of Granola Bars III from Allrecipes.com. I have reduced the sugar to a half a cup, substituted maple syrup for honey and upped it to a full cup. This makes them less sweet and more chewy. No nuts since the kids can't have them at school. I will not be putting in the chocolate in for awhile, but I will put in dried berries.


Here is a recipe for cheese crackers I tried today, which will save DH from buying boxes of goldfish or other junkie crackers. They were completely delicious and took much less time than making cookies. They literally take about 10 minutes to make plus some time in the fridge. I added some mustard seed (crushed in my mortar and pestle) for extra zip.

We don't drink pop normally, however DH buys Jones Cola's for a special treat. I admit to have a few of these when we were on holidays camping on Pelee Island. Normally, for birthdays and parties in general I will make iced tea - I will continue doing this because I think the little bit of lemon I add is much better than pop full of white sugar. (Jones at least are made with organic cane sugar - but cane sugar nonetheless).